Saturday, 31 January 2015

A New Year

I am sure as you get older the time goes quicker. I can't believe it has been five weeks since the last post. Well it was last year.
I haven't done anything worth writing about down the shed at the moment, working instead on another project inside that is absorbing a lot of modelling time. Nearly two thirds the way through so hope to resume residence down the shed soon.
It certainly has been a time of announcements of late. All the past years of promised models are now starting to show up. Yesterday when I was out a "we've got a parcel at the local post office" card was left at the front door. Couldn't think of what it was as I didn't remember ordering anything off the net or anywhere else. As soon as the parcel was handed over I saw the Auscision stamp on the back and worked out it was the 45 class. It shared the carry bag with two litres of milk on the way back home.
It was a strange feeling when I got home. I knew what was in the parcel, I knew what a 45 class looked like but was not fussed to rush it out of the bag and start drooling over it. Reading some of the modelling forums comments tonight you can sense that 'don't care anymore' attitude creeping in. Dinner was cooked and it stayed in the box until this afternoon when I finally went to shed to view it.
December saw the 48's delivered, January the 45's and hopefully in February the 46's. Thank goodness I am not a modern image modeller as the Auscision NR's and SDS's 81 classes have been announced. I only wish that Auscision would have made the decision to make their locos with sound much earlier, just as Ron does with his models.
I opened the lid - easy. Then the model is surrounded in a plastic cocoon that didn't want to release its inner prize. I could see it but couldn't get the bloody outer sleeve off. I was certain that if I pulled too hard, it would suddenly release, come out like a bullet, land on the floor and that would be the end of it. I even thought of getting the hobby knife out, showing it who's boss and slicing it down the middle. But a bit more persistence I managed to extract it to the next stage. Wow after all that pulling, shoving and pushing I could only hear two loose items in the box. Peering through the sides I could see the front coupler had broken in half and a box from the side had dislodged. At least the driver was stuck firmly in his seat and doing the job he was glued in for. 
The layout hasn't operated for quite a few months and one of the problems with that is the amount of spiders that have decided to cast their webs all around the layout. Sounds like a good time to invest in a few cans of Mortein. One of the downsides of webs over the line is getting them all over the locos as they move around on the first run. It wasn't until I got todays photos onto the widescreen monitor that you can see some webs over the front of the loco. I couldn't be bothered to redo them nor Photoshop them out so they are there if you look hard enough.
So for todays trial for the 45 she did a ballast trip as a single loco load, then went up to the Bodalla mine and then lashed up with the two recent purchases  4817 and 4819 for a triple header run. The locos will stay in their virgin paint scheme until I can arrange to get them weathered.
Anyhow here are todays photos:
On the way to Candelo to do a mine trip.
 4501 did a trip up to the mine as part of the testing and getting the crews familiar with the units.


Later on (it was a busy day) 4501 teamed up with 4819 and 4817 for a triple header run with a coal train.


Well I can predict the next update to this blog will probably feature the 46 class. It is going to be an interesting era with all the modellers beckoning for more and more details on their equipment and then watch them operating their electric overhead models without any overhead wires - magic.
I was cleaning the track today at Candelo and then wondering how I was going to do it when that space between the track and the overhead wiring is seemingly so small. Well we will have to wait and see.


Tuesday, 23 December 2014

48 reasons to love Christmas

Well what will probably be my last post for 2014 ends with some good news finally. I received a phone call late last week stating that my two 48 class had arrived. Not only arrived in Australia but arrived in West Ryde and were ready for pickup.
I chose today Tuesday to venture there to pick them up. I expected to see a line out the door on approaching the shop but there wasn't any. Getting into the shop seemed like any other day, not many customers inside to get in the way. There was a guy set up at a table ready to hand over your model.
I was surprised when the guy said he didn't need to see my receipt just a name and proof of identity to obtain the models. This caught me by surprise and a little upset. Only because I had actually managed to find the receipt I had stashed away in my bedside table and was able to find. What was more remarkable was the fact that after nearly six and a half years I could still read the receipt and it hadn't turned to dust like ancient scrolls do. So I proudly showed it to him and he rubber stamped it with some words I haven't bother to read yet.
Both models were duly taken out of the box and set up on the test track and now have about four metres on their speedos. They seemed quite and smooth. There was a steady flow of customers picking their models up and looking at my watch remembered I had to be at the station within two minutes to get my train. I ended up getting there just as the train came in.
So tonight I managed to get down to the usual hack spot near the gully bridge and was lucky enough to get some shots of the two new 48's on a ballast train. I was that lucky that the driver had even stopped for me to take photos.
They have not operated on South Coast Rail yet. They also seem a bit on the light side but I don't intend to run superlong trains.
Well I'll close of my last 2014 blog with a few shots taken of the new 48's. I hope to get them weathered in the future.
2015 promises a good year for modelling. Have a great Christmas and see you on the "Other Side" on the calendar.
Driver Mark Wun and fireman Al Ko get ready for the 48's first trip


Friday, 14 November 2014

A New Coat

Finally it has happened, the outside of the shed has received a coat of paint. It has taken a few weeks on and off to get it done and now looks good. All the eaves have been boxed in so unless I accidently leave the door open one night, that should be the last you will hear of possum problems.
 Last Friday 7 November I was able to partake of a steam transfer trip from Sydney to Gosford. I only got wind of it on the Thursday, a quick ring around of a few mates and none were available. For only $20 I was able to get a compartment to myself in an FS carriage. For a further $20 I could have gone onto Broadmeadow.
The steamers both 3237 and 5917 from the Lachlan Valley Railway are doing trips around Newcastle to give people their last chance to travel to the terminus of Newcastle. In a completely stupid moment of destruction the line is to be truncated at Wickham and people will have to transfer to a bus for the last few kilometres. It seems both governments when in power have been bought by the developers to vacate this corridor to enable high rise units to be built. A very short sighted plan. Need I say more.
Tomorrow Saturday I will be travelling to Newcastle to join 3237 on a return trip to Singleton. We have around two hours there for lunch, rejoin the train and then back to Newcastle, rejoining an intercity train back home. There will be a group of 5 of us to enjoy the day. Thankfully tomorrow the temperature will be lower than the 40c temperatures Sydney has had today.
I just remembered that I opened a Flickr account some time ago to put "overflow" photos of the layout onto. Rather than troll through the blogs I have put them up on Flickr. There are now a total of 147 photos of South Coast Rail with 74 photos added today.
Have a look here:https://www.flickr.com/photos/south_coast_rail/with/15599507599
Interesting with the current talk of the cracked gears in the 44 class I noticed some photos of the Eureka 60 class from 2007. How time flies!! And after enduring seven winters and summers in the shed it still operates.

Sunday, 26 October 2014

Garratt comes to Candelo

Another black and white while I had some filum left in the camera.

6039 this week did a light engine trial to Candelo. It is seen in good company with 3610 in the loco sidings.
Another milestone happened this week when I finally finished boxing in the eaves of the shed. It wasn't easy putting these sheets up on my own and luckily only one sheet managed to break in half as it was being put into position.
Now all that remains to do is to paint it. I have always used Solagard in the past and was used to paying around $50-60 for a four litre tin. Well yesterday I got one cent change out of $80. At least I had the choice of any colour I wanted. I chose a Mist green colour so that the shed blends in with the fence, the grass, the trees and the garden.  Some times I even have trouble finding the door. In the photo above can be seen the bent key referred to in a previous blog, now replaced with a straight one.
Today Sunday is stinking hot and no way I'll get the paint brushes out. Its almost like a switch has been thrown, the cooler weather is gone and the humidity has arrived.
So it has been a bit of activity in the shed this week. The sign on room for Candelo Loco has started to get their garden in place. At least the mandatory palm tree has already grown and in place. Says a lot for getting advanced plants.
The gardens have begun to sprout out front of the loco chargemans rooms. A safety fence has also been put into position. It was constructed from code 55 rail, soldered, painted white. The rail I used was a length of Railcraft rail which was pre weathered. By using some Tamiya white mixed with isopryl alcohol it gave an aged/weathered look straight away. Structures around loco depots were never pristine except straight after something was painted and that would have only have been for a few hours.
A tarmac path was made using dark grey chalk but the only piece I had wasn't the right colour.
Jock looks nervously on as a garratt edges up to the buffer stops.

Here is a high level shot of the loco depot area. It doesn't take long for an area to develop once the ballast and groundcover are put into place. The yard lamp and palm tree pierce the vertical and give a different perspective to the scene. As can be seen a pathway around the palm tree is in place to be finished off with edging and more gardification.

Wednesday, 15 October 2014

So far..........

So far, so good. It seems for now my little furry friend? has left the building. Eventually the eaves will be filled in and he will be cut off forever.
Managed to start laying out some ground cover around the loco depot. Luckily we still have dirt verges in the street which means I don't have to travel far to get some dirt for ground cover. It is put through a strainer and fixed down the same way I do the ballast. Its easy to vary its colour by using chalks rubbed over the dirt and then spread using the finger.

Candelo is starting to take shape slowly. I have included a few shots below.
A shot of Candelo loco depot prior to the invention of colour.

Car park for Candelo loco depot

Ballast train has just ballasted the loop
Budd set arrives on the loop
Victorian T and Y class take over Candelo loco

Saturday, 11 October 2014

In the poo (still)

Well Saturday morning has come and gone and after breakfast I ventured down to see if my resident pest had gone.
I think so must be the answer judging by the new hole he has chewed through the new piece of plaster put into place this week.
Kindly disregard the skid marks on the wall. I don't know how he could make such a mess. Why is it that possums are supposed to be protected?
 The whole room stinks of possum piss and anyone that knows that smell would be put off going in there. I don't think he likes me. I would have liked to see how he managed to get the piss half way down the roller door. This has led to the conclusion that it must be a male. Females are not that versatile. Guess its the mop and a bucket of lavender disenfectant into action.
Damage to rolling stock? Minimal as its was moved away from the window where I guess he spent most of his time planning his escape.
The easy part was getting a replacement key for the roller door. I got two this time, just in case. A pair (all though I only needed one set) of pliers managed to extract the broken bit from the lock. A bit luckier than Paul from WA.
So more wasted time now required for the hole in the roof, then we move forward.
Last but not least the little bugger left me a calling card (again) but I have got the boys onto the job of cleaning it up.

Friday, 10 October 2014

In the poo (again)

As much as I would like this blog to be devoted to model railways it seems there are other forces working against me.
Many posts have been devoted to the ferals that inhabit the shed. Well this week was going so good in that I had finally sealed across the front of the shed under the eaves. The painting is yet to come and it will then start to look half decent.
During the week I have done some more ballasting and painting the sides of the rails. Now yesterday afternoon I thought I would pop in and have a quick look and see if the ballast had dried.
But when I got inside, turned left and went to have a look at Candelo what I saw was mayhem. There were locos and carriages on their sides all over the place. I do not recall any earth tremors the night before and immediately felt my little furry friends had paid me another visit.
Maybe this was payback revenge for sealing up the hole into the shed (that they had put there) in  the corner of the roof. On the main board down the middle of the shed (Bega) the garratt had been tipped on its side. (goodness how many parts have fallen off) and random wagons on different roads were tipped over.
I could not hear any activity anywhere in the shed, maybe the little bugger was asleep planning his next raid? So all I could do was to right up the overturned and hope for the best.
So going up for dinner the door was closed then to suck a bit of sympathy from the wife. 
Today Friday after having been out most of the day, I wondered down again to the shed, turned left again towards Candelo, you guessed it the little bugger was back. Candelo suffered most.
Not being an expert in animal faeces, what I did spot was a calling card on the floor. Having seen enough of this rear end product over the years I like Sherlock Holmes deduced it was from a possum. I apologise in advance for subjecting the following shots to you, but if its not from a possum someone out there may be to identify it.
Although this first shot may be sufficient to identify the said animal, the second shot is only included for the fantastic stacking skills of the phantom layer. (made harder as the landing strip was on an angle!!)  Assumed as coming from the same creature it was probably as result of panic setting in when he was up against the window with the outside with its green trees beckoning him to join them. They actually looked like O scale black puddings. The bit I liked was that they seemed to be laid dry and not wet and sloppy which would have taken longer to clean up and would have played havoc with the vacuum cleaner. The cars were also part of the accident scene.
Above is a photo of the carnage brought upon Candelo yard. All I can say is that I'm glad it wasn't any further advanced here or more damage could have been done.
I'm sorry I had to share these pictures with you. The good news was that no one was hurt and all the locos and rolling stock has been righted. After cleaning up the mess I thought if I opened the roller door the phantom mangler might disappear into the night. Getting the key I opened the roller enough to let any animal up to a metre tall to make a quick evacuation while I had dinner and watched the news.
So after a few hours and darkness had come, I went out to re-close the door. Now there is one thing you must do with roller doors and that is to remove the key before pulling it up. As I look up I see a bent key and as I try to straighten it up to pull it out, yes it snaps with half key in and half key out. 
So tomorrow my project will be to Google how to remove broken keys from locks. Wish me luck.


Saturday, 4 October 2014

Into Loco

Not a lot of progress inside the shed lately but finally after around 25 years I have started to  box in the eaves of the shed. This will finally stop all those pesky creatures that normally live on the outside from taking up residence inside the shed. Amongst those creatures are possums and rats. (See multiple older blogs for details) Its one of those "will do it later jobs" which you always seem to put off and never get around to doing. I must admit the visible side of the shed has had the eaves filled in and the left hand side of the shed painted. Its so long ago but the paint must have run out as only half the front was painted. Scrap bits of timber were nailed up to the opening to deter pests from entering the roof cavity. A few years ago I saw a swarm of bees who thought the shed would make a nice home. Thank goodness they didn't stay long and left.
I had some fibro sheeting put away years ago just quitely sitting along side of the shed waiting for the big day to be used. Now to put up long lengths over two metres long up a ladder on your own and be expected to nail upside down and hang on to avoid falling is a big ask. So far no falls but I had to devise a  way of not only getting up the ladder carrying a large sheet but have it stay up there so I could nail it. I put a few scraps of timber nailed to the shed which held one edge. To hold the outside edge, I drilled holes in the bargeboard and put nails in the hole. Then after carrying the board up the ladder, slipped the shed edge over the scrap bits and slowly pushed the nails through along the bargeboard to support the sheeting. Have you ever tried nailing upside down? I had to pre-drill holes to make this task easier.
Now as this sheeting had been around for quite a few years I suppose I can't blame it for snapping in half as I was carrying it up the ladder. A few choice swear words, down the ladder again, recut the sheet again and now the sheet being half its original length was so much easier to handle. Well I nearly have the front bit done and this will allow me to eventually get another coat of paint onto it.
Inside the shed I have been doing some more ballasting around the loco roads, nice and dark with dropped oil spots as you would expect in this area. A few bits of grass around the point motors to blend and hide them was also applied.
During the week I hope to get some timber about 150mm high to sit on the window sill and form the backdrop to the station. This will make it visually better and allow a backdrop to put behind the station. It will also form a good backdrop for photography. Once this is done the platform can be put into place.
When I was uploading the above shot from the camera to the computer, there was a folder dated November 2000. Quickly doing the sums this was 14 years ago, have I really been building this layout for so long?
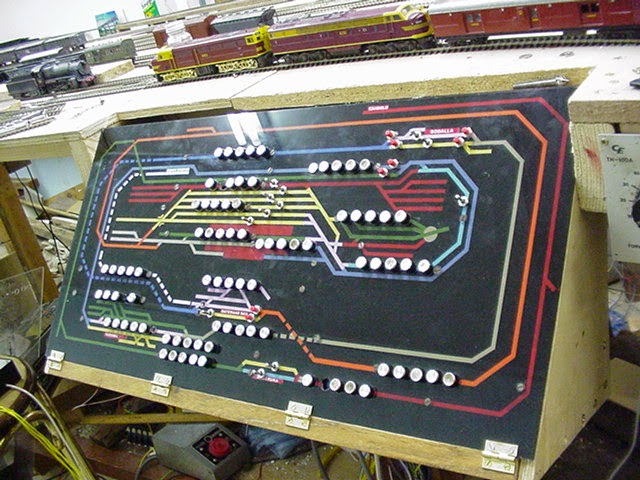
This is a shot of the control panel for South Coast Rail. Now I'm almost sure DCC wasn't around in 2000 so this will allow me to post this shot without getting into too much trouble. It was made on a sheet of perspex. The tracklayout was drawn in reverse onto the brown paper. Then the track sections were cut out with a razor blade and painted so adjoining colours were different. Once all this had been done the remainder of the back was sprayed with black gloss paint. This then secured the track painted lines under the black paint. The front layer of protective paper was then removed. The pushbuttons were a Dick Smith product I got many years ago when they used to sell usefull things not like now. Originally an 8 gang pushbutton unit, I removed three buttons to allow 5 controllers to control each section of track. I has worked well to this day. The usual pushbuttons for the point motors were also installed. The only drawback with this style is that you have to be sure you don't want to change the trackplan once its all painted up and the holes drilled for the buttons.
Tomorrow I will be heading off to the Liverpool exhibition to catch up with a few people and hopefully enjoy the day.


Wednesday, 17 September 2014

The Good Stuff

Well as reported in the last blog I had spent a few weeks diving under the baseboards redoing the wiring for Candelo. So far so good and the wiring still seems to work. And my back and arms are now feeling OK.
Wiring is a thankless job we have to do to get the systems operating. No one comes to view your layout and says "Gee can I see the wiring in your control panel?" You can spend hours doing it, then we go and hide it all away.
Scenery is another matter. It is meant to be looked at and appreciated. Its what gives a layout character, some of course do it better than others and some just completely ignore it and just like running trains. Each to their own.
This week I have finally started go do some ballasting and started with Nos 1 and 2 storage roads.
When I pulled up Candelo tracks I tried to rescue as much ballast as possible. No need to buy ballast twice for the same spot. Luckily I had used the old pva glue and detergent system of laying the ballast. The spray bottle got to work over the tracks and after ten minutes the track was able to be lifted once the brads had been taken up. The spent ballast went into a container and after going through the sifter was once again ready for re-use.
Storage sidings 1 and 2 will be mainly used for holding the BCH coal hoppers as they are split up and taken to the two close by coal mines. These two roads will effectively have more dropped coal around them.
In redoing Candelo I should be working my way from the back to front so as not to be knocking poles, structures etc along the way. But I was itching to get some ballast down to see how it goes. I don't use any underlay in the yard as in real life there are no shoulders under the track, all just flat dirt. I also make sure I paint the sides of the rails as I go, you never see silver rails in real life. My preferred colour in the yard is Tamiya Khaki drab which is a muddy, dirty colour.
Looking the other direction this is the current extent of ballasting. Track is easy to do, its the ballasting around points which is tedious and slow, making sure the point blades don't get glued up along the way.
This shot shows the other side of the ridge not normally seen from the aisle. I am using florist foam, pushed into shape and glued to the plaster. The foam will make it easier to push shrubbery into this area rather than having to drill holes. I have painted this with a brown paint since which helps to blend it in with other scenery. The point motor is not seen from the other side as well and the point motor to the left will eventually be covered in with a removable flap for access.

Slowly but surely Candelo becomes reality as the scenery spreads. Compare this shot with the first shot from last posting and the microswitch has been hidden under the foam. As I have had to cut out along this existing ridge to fit in new points motors, I will work my way along redoing the scenery. Then the rest of the yard will be ballasted.


Thursday, 11 September 2014

Surface, Surface

Well who could imagine that it has taken me five weeks just to get the control panel in, wired up and finally all the points operating?
I must admit that it has been the most frustrating five weeks in my modelling career. The title of this blog entry "Surface, Surface" reminds me of the order given for submarines to once again return to the surface. True I didn't need aqualungs, goggles and flippers to be there, it was towards the end that I was doing a countdown of the number of points left to wire up.
All of the point motors for Candelo are situated on top of the board. Having a sample of the "underboard life" when I was wiring up the various sections, I couldn't imagine trying to drill and screw upsidedown whilst in the squat posture trying and get the point motors into position to actually work. No it was an easy decision to place them on top.
I have used some of the newer Peco point motors that look similar to the real point motors as per the photo below. To operate the polarity of the points I used a small microswitch that was actuated by the arm of the point motor. So far this has worked well. The microswitch will eventually be covered by scenery in this area.
Another point motor will be covered by a small garage which I will rename a shed as no car will ever get in there now that the point motor takes up all the space. Some of the points have the extended throw bar extending under the tracks to the point motor. There are at least five point motors that have been built into and embankment an will be completely covered in to be invisible to the operator, but readily accessible by removing some scenery.
A few of the point motors sit in the PL 12 Peco adaptor base and I have used the PL13 Accessory switch pushed onto the Peco point motor. I have had mixed success with these PL13's where some switches were very hard to slide back and forth, they seemed to bind. So sometimes when all these assemblies were put together it was a matter of luck to get them to work. A bit of WD40 spray usually got it all moving.
So I had fun doing the wiring (not). As I tackled each point motor, I would head off for underneath looking for the telltale piece of coloured paper sticking down to locate my next target. It was like Jenolan Caves under there, the wires representing anorexic stalactites. The wires after having been soldered up to their respective push button on the panel snaked their way underneath the layout looking for their hole towards the point motor. After wiring up the button was pushed and if the point actually responded, a cheer was given and up to the house for a celebratory cuppa. Then the microswitch was duly wired in as well. It took a while to work out the logic on how these little buggers actually worked. So when the actuating arm was pushed in the end lug was energised and the middle one wasn't. Then I had to follow this out, saying OK when the point is set for the curved portion then I want the power to the frog to come from this side of the track. What made it more complicated was that I had soldered all the droppers down in the one go and used any available wire. Then I was saying "Now its the red wire from the microswitch to go to the left hand side green wire dropping down from the point." (I think) Now I am going to need the wire strippers and wire cutters so take them with me before I get under the layout. Under I go  hoping to quickly find the wires required. All good, but when I get under there I am now having a problem with my glasses in that I don't seem to be able to get my head up close enough to clearly see the ends of the wires. No problem, if I whip off my glasses I can see the ends of the wire clearly. But bugger where did I leave the wire strippers? No can't see, back on with the glasses, ah there they are now safely in hand, glasses back off again and the wire work completed.
Imagine playing this game when I needed to use the soldering iron under there. Glasses off, wheres the fricking iron, ouch just found it, ah whats another scar, my hands are getting old age wrinkles anyway. My greatest fear was after taking off my glasses was having the soldering iron have a stray wriggle and end up melting one of the lenses, luckily this didn't happen. But what happened along the same lines was when I was deep under and had knocked the iron off the shelf unbeknown. It wasn't until you got that burning smell of either paper or plastic that I had to move quick and move it.
Now I am starting to see the sense of high level baseboards. When trying to get up to bottom of the board you can't kneel because you head hits the bottom of the layout, so you have to squat, the old necks getting a workout and with some luck you finally get it wired up. I eventually reckoned that without going through the wiring logic each time, I had a 50% chance of getting it right the first time. Mostly it went the other way and that involved another trip to the surface to change over the wires.
A couple of times I got wrapped up in surplus wires just hanging down, a rotate the wrong way would result in it either getting ripped out from somewhere or wrapped around me.
Many moons ago on the main board at Bega I had a diode matrix made to route set the tracks into the mainyard from the main line.  A retired friend did all the paperwork for me I just had to follow the diagram and it actually worked. It was now my turn to repeat this for the meat and oil siding. As much as I searched  the internet and tried to decipher the diagrams, I decided to turn to my electronic guru friend Jim from the Kamilaroi Railway. Within no time he had a diagram whipped up, emailed to me and then I went searching for a piece of vero board to assemble the parts onto. Murphys law can't find it, so into the local Jaycar shop to get a piece of vero board and also some IN4004 diodes. Cheap at 50 cents for four diodes. This is the left hand matrix in the above photo. When you follow through the logic of how it all works it is quite simple.
When ever there was a hiccup during the wiring, I would down tools and finish for the day saying "will solve tomorrow with a clearer head" And usually it all worked.
In amongst all of the trackwork I also included a double slip. Then after having the frogs separately powered I realised I had to work out a matrix for it as well. I had six buttons feeding into the matrix, to end up working the two point motors. This is the right hand matrix in the above photo. Then slowly one by one the wires were fed into it and tested. No matter how carefull I was in checking and rechecking the wiring diagram, I only got a 85% mark. This resulted in trips in and out up to the panel to see if it all worked. Eventually all worked and around lunch time today success finally with all points and sections working. I wish I could have hired a small boy or a dwarf for a couple of weeks to help with the wiring. (Can you still say that?)
 As the photo above shows poor old Bodalla has copped a hammering of late. It will eventually be cleared and refurbished once Candelo is completed.
So this afternoon I got to run a few trains around Candelo to test the points and sections.
The Victorian B62 class along with the new C van recently obtained at the Caufield exhibition test some of the trackage at Candelo.
Whats next? A big cleanup of the floor and baseboards and possibly getting the passenger platform underway. Yee ha, wiring done.