Wow, still can't believe how quick this year has gone or nearly gone. I think back a few months when it was a lot colder and I was writing up my third Victorian trip blog report. That beautiful feeling when you rock up to Belgrave station on a very cold morning and the mist is hiding the narrow gauge train we are about to travel on. The smoke from the loco giving away its location. Now compare today when I am writing this in mid thirty degree temperatures.
I have been keeping a photographic record of the construction of South Coast Rail for various reasons. One reason can be help is when the scenery is in place and you want to check where wiring, baseboard joints etc are located. Handy. It also lets you look back and see how far you have come and progressed. Looking at the photo folder for SCR I discovered that I have been underway with the current narrow gauge layout for over three years. The oldest folder is dated December 2015. Prior to this I have collected the older HO SCR photos. They are in monthly folders and the better photos are still available on the top right link on this blog under Flickr hosting.
So far on the layout apart from a few humans strolling around, a mock up building and various trucks and cars, viewing the layout without a direct comparison with the narrow gauge track and standard gauge makes it harder. All the Victorian narrow gauge systems had transfer locations where goods could be transferred between gauges.
 |
| Pit area outlined ready for cutting out |
|
When designing Eden yard the transfer track was an essential inclusion. I didn't have a lot of room to include one but another problem arose when trying to match the model with the prototype. As the floor levels of the narrow gauge and broad/standard gauge wagons didn't align it was usual to ramp up the narrow gauge track so that the floor of the narrow gauge wagon was at the transfer platform level. On my version I didn't have the luxury of length to ramp up the narrow gauge track so I reversed the idea and lowered the standard gauge track instead.
 |
| The pit has been cut out and lined with styrene and S truck added |
This was the only way it would work for this location. Initially when laying the narrow gauge track, the points were operated with the wire in tube method. The track was laid furthest from the side the point would be operated from so that the channels could be routed for the tubing. Initially I had laid the tubing in across the location where the pit would eventually go. If I left it there then there would have been some tubing going across the top of the pit. So I had to bend a few 90 degree corners to lower the point wire under the pit bottom. It plans to think ahead. (sometimes)
 |
| Sides of the pit have been lined with Cyclone sticks |
I lined the pit with some styrene which enabled the old tried and true Cyclone ice block sticks. These were provided by my wife. She doesn't call it an addiction to them but they are always high on the shopping list. Just cut them in half for O scale and they work out well.
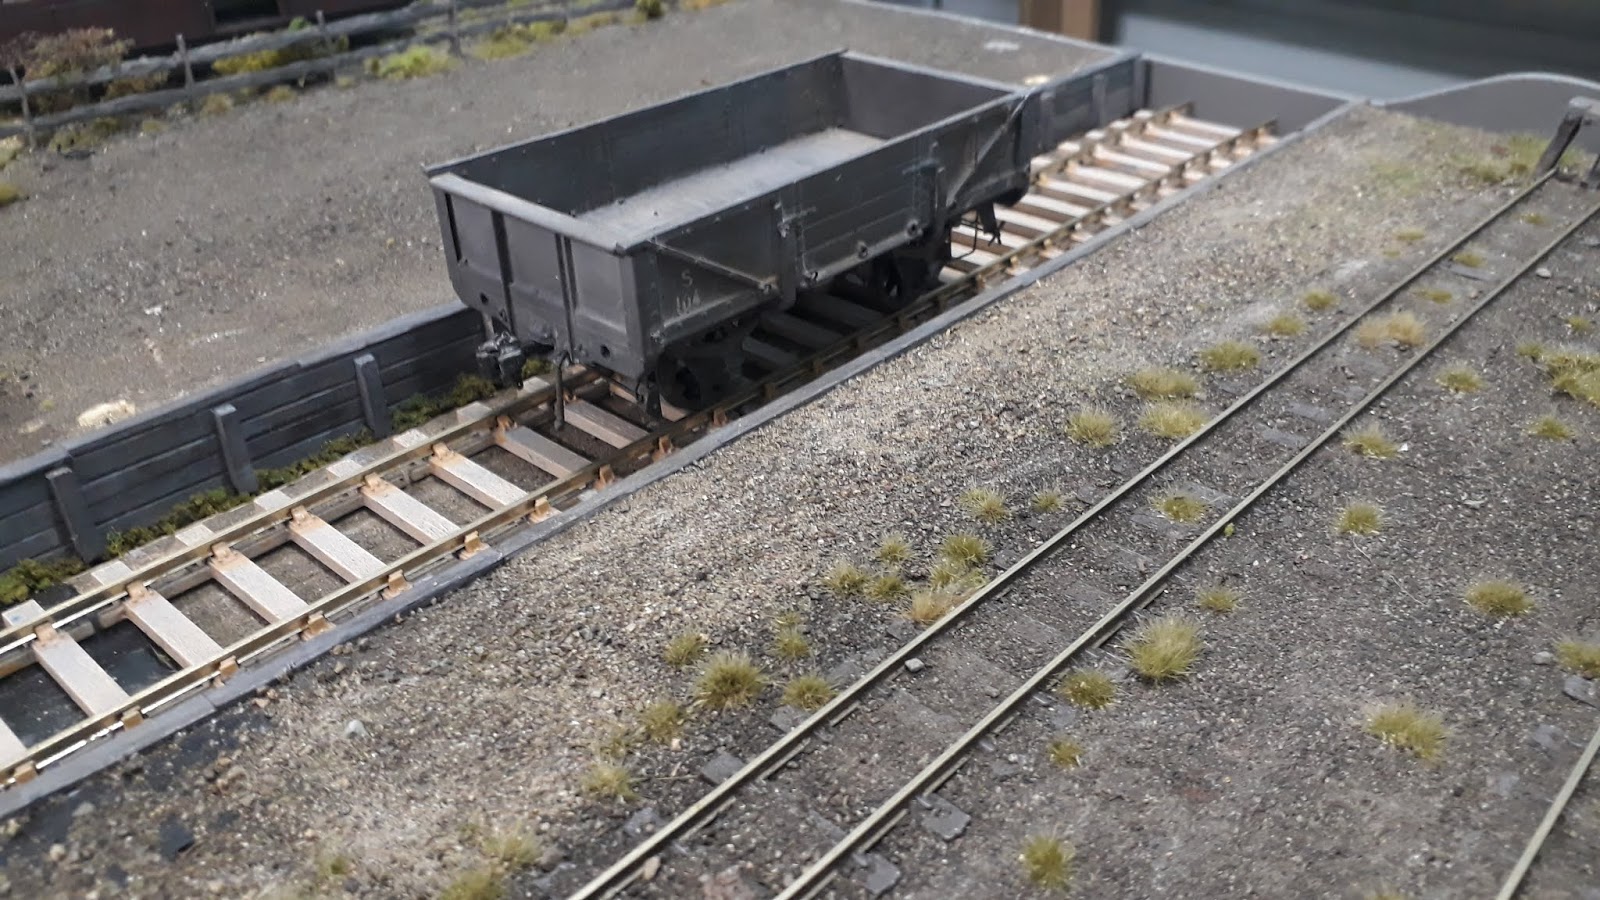
 |
| An 'S' truck in its final resting position. |
I needed a wagon to place on the standard gauge track in the pit. As my layout is placed on the far south coast of New South Wales the cheapest, smallest wagon I could get was an S truck one of over 10,000 that were built in the past for the NSWGR system. I was able to get a just released O scale kit and had help from one of the group members (thanks John) who assembled it for me.
 |
| A lone S truck waiting for some work |
 |
| The Peco O scale track is laid in the pit |
|
|
|
|
 |
| View from the other direction |
|
John who had also converted from HO to O scale was able to supply a surplus section of Peco track to fill the bottom of the pit. Some of you would have got out the packet of spikes and hand made sleepers and done the job properly. And even though this section of rail had rail chairs instead of spikes, these ease of using the ready to run track over hand laying track was a great time saver.
 |
| Ready for the dirt! |
|
The side of the pit was also painted up with some Tamiya dark grey paint and supporting upright timbers were also glued into place. A timber capping was also laid across the top of the pit timbers.
 |
| Weeds in place already, known to grow quick! |
 |
| Layer of dirt applied, starting to look better |
|
Another trip to the local oval for some more dirt which was spread over the bottom of the pit. I am sure the local council is wondering why these holes are appearing in the car park.
 |
| Finally the weeds are applied and it looks like a decrepit pit |
After an application of various weeds along the bottom of the pit it is pretty close to my vision of how it would turn out. I may need to install some type of buffer stop at the far end of the pit.
The hard part of the pit has now been constructed so if I don't get to revisit it again it looks complete. This is only the first construct for this area. The next build will be the transfer platform between the standard and narrow gauge tracks. Then I will need to build a transfer shed over this area. Once this is all done then I shall build a transfer crane. The pit is shoe horned into its location but this gives the eye plenty to concentrate in one place. All the yard junk that you find like drums, crates, timber etc still needs to be placed.
So this will be the last post for this year and 2019 will hopefully see the majority of the remaining scenery at least started. I have many structures to do but I will keep plugging away with it all.
I hope 2019 will be a good one for all your layouts, thanks for all your nice comments over the past year on the layout and will catch up in 2019.