Progress on the bridge has been slow and I can now nominate the working time in years now rather than months. At this stage there is no rush for a finish date and I have been slowly progressing with scenery work around the actual bridge.
I am glad I spent the money last year to sort out the drainage problems and water getting into the shed. With La Nina running beserk on the east coast of Australia at the moment it's hard not to get caught out. I am glad my slackness in getting the pile of carpet tiles laid has paid off, so when they finally get laid the floor should remain dry.
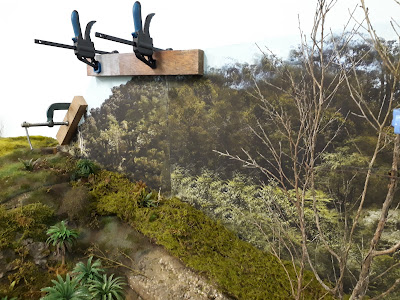
When I got the backdrop produced by Office Works the final print wasn't wide enough to cover the complete back across the bridge baseboard, which meant I had to come up with 'add ons' on each side. I was able to massage some local photographs of the area to be able to join and extend the picture. The idea was to taper the photo down to the top of the hill so it could blend in. I made some more timber backing boards to join the existing board. This was rather messy and in reflection initially I should have made the backing board large enough to extend right across the back.
 |
| The extension piece |
 |
| Left hand side added |
In the above photo you can see the additional piece in position, I wasn't worried that it wasn't a perfect match and that all of the picture wasn't in focus. It is just a background item and will be eventually covered by forest in the foreground.
The second piece I had to produce was to extend the river downwards as the initial bottom of the photo was set too high. I will need to match up where the two pictures join, cut and then blend the two, hoping it comes out all right. The is where the poured river will come up against the background. I am semi dreading this part as it seems you only get one go at this and hope it comes out all right first go.
 |
| The 'moss roll' |
I am always on the lookout for items that can be utilised in scenery work whether it be from real live such as branches, lichens etc or man made objects such as this 'moss roll'. I came across at a local artificial plant warehouse. There are many items you can get that can be repurposed for a layout. You have to be mindfull also as to what scale you are modelling. I get more scope as I am modelling in O scale so more items scale better. This moss roll is around 1.8m long when rolled out and is now sitting down the left hand bank hill and up against the background picture. As foam has been used to form the hill, I also found some long 'u' shaped pins at Spotlight which are pressed through the moss to hold it into place. This roll forms the floor of the hill and can also be cut and teased up for added variety. This item was around $18 which I consider good value.
 |
| All the 'extras' are added |
The bridge while in position is still removable until all the scenery is in place. I can lift it up to work there when needed. I am working down the left hand side towards the river and undecided at this stage if I will do the river next or scene up the right hand side then back to the river.
 |
| The hill is slowly sceniced |
 | ||
| Slowly but surely it all comes together | |
Well that's where the Thomson River bridge build is up to at the moment, hope you have enjoyed the long journey so far.


