Saturday, 29 July 2017

We can now cross that bridge when we come to it.....


If you had been a previous follower of the HO South Coast Rail, I hope the last post and the link to the Flickr photos brought back a few memories. I was reading the August Australian Model Railway Magazine today and looking at the new products pages you would hardly believe that this hobby of ours is slackening off. There are heaps of products now available to drop straight onto the tracks and just go.  Auscision are finally offering their locomotives with sound. Far from being envious of the new products my hip pocket is glad that I have made the change over to On30. The range of products other than the Haskell NA locos and their NQR wagons are basically kits that need assembling and painting.
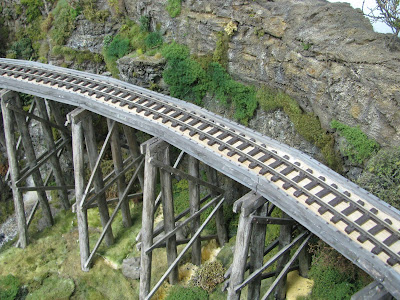
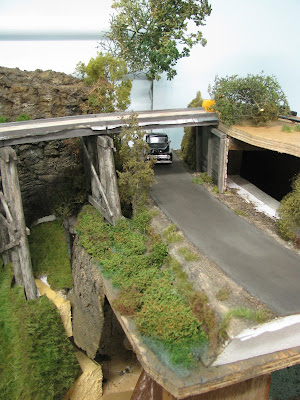
Meanwhile back at the layout, the trestle has advanced far enough along to be able to finally lay the track across it. The trestle is built on a 30 inch radius curve and fits in nice to the corner module. It took quite a few hours to get the trestle made, but I am happy with the end result.
Bare roadbed waiting for track
I made a choice to use the Peco O16.5 narrow gauge track as opposed to the only other commercial track that being the Micro Engineering brand. Those two brands are the two extremes of the ready to run track. The Micro brands sleepers look to anorexic and the Peco brand suits the English style of track. Some where in the middle would be nice. I know the answer is to hand lay some track  but if I knew I was to live till 150 years then I might try that method. Any how once the Peco track it is painted up and ballasted it doesn't look too bad.
Track has been laid across the trestle awaiting ballasting


Join between two modules
First load of ballast dumped
Between each module I have used a section of printed circuit board and laid across the joint. It is then soldered down. I haven't cut the rail at this stage preferring to maintain electrical continuity. The tracks will be cut one day when the layout needs to be moved. Sufficient ballast is used to cover up the lack of sleepers.
I also added a check rail to the trestle as per common practice. It is supposed to prevent rolling stock toppling off when a derailment occurs. I wonder if it will still act that way on the models?
The check rail was made from a piece of leftover Code 75 rail which in theory sits lower than the code 100 rail. This should allow me to clean the track without rubbing off the rusty painted check rail. It didn't end up a perfect parallel track to the main running rail but this should give clearance for the flanges.
Another addition I decided to add to the trestle was the nut and bolt washers on the top timbers. Again I got my inspiration from the Monbulk trestle. There are 182 nut an bolt castings across the top of the trestle. So it took a while to drill all those holes and then place each casting into the hole with a small dab of glue on each one. Now you know why it has been slow progress in this corner.  
I decided to model a ballasted top trestle as opposed to open timbers. I am sure this method was quicker and easier to do.
Looking the opposite direction from the previous photo
 Although the ballast has been down for a short while, the weeds are starting to appear, maybe I need to model a poison train to keep the weeds down.
I chose to add an oil/grease trail across the middle of the tracks, this gives some variation.
Climax 8 trundles across the ballasted trestle


If I thought this trestle absorbed a lot of time I wonder how long it will take to complete the Thomson River bridge? It scales out at around 1.90 metres long. Oh well I like a challenge!
NA + trestle

Tuesday, 18 July 2017

In Memory of.........


I had a call last night from Marcus Ammann. He was asking why the link to my HO South Coast Rail Flickr photos wasn't working properly. Well I said that it eventually gets you there but really not where is should go first off.
Marcus being an expert in URL's http's etc worked out that I had too many letters after where they should be. So with a little massaging, we got it working properly.
I hadn't visited that site lately and going through it once more opened up the memory floodgates of my old HO South Coast Rail Mark 1. It was mainly an external resting place where anyone could drop in and remember the layout as well. Hopefully it is safe there "up in the clouds" ( I think I have got that bit right.
For anyone who hasn't been along for the journey SCR was started back in around 2000 in a shed around 34' x 12'. It took around 15 years to get to the stage shown in the photos. Over the years I have taken many of hundreds of photos, some good enough to publish on the blog, many deleted and some just for the record.
So taking the opportunity today I have decided to upload 483 images of South Coast Rail to the Flickr site for either your enjoyment or boredom. Originally I was just putting the good ones there but decided I need to show some of the early days where the baseboards were just bare and in the need of a good dose of scenery. Over the intervening years there were some dramas in the shed as can be expected. I have included some of these photos. Some would remember the fun had with the local possum. There is a shot of him with his bum sticking through the hole he made into the shed. I only found out he was still alive when I poked the longest stick I could find into him.
There is the day when I found out that roof leaks need to be fixed and not ignored. The photo shows the panel of gyprock hanging like a guillotine and the rat droppings that decided to fall over the layout and floor.
Kicking off the photos is a shot of the panel I made up to work the whole layout. I was a DC man and this concoction of wiring was a necessary evil of going down that path. Don't be impressed with the underneath shot of the wiring. It's just what you had to do to get the thing working. No wonder I have gone to DCC on the new On30 layout!!
You can see how the influence of the Victorian Railways had crept into SCR. I had a reasonable fleet towards the end. They are all sold off now and hopefully being enjoyed elsewhere.
You can see the times when I bought new locos in the photos, the 46's, L class, 45, 48's, 422 etc. They would become a feature of another blog as I would excitedly photograph them.
Looking back now on the photos I am quite pleased how it all turned out. Considering the number of years I have been modelling you would hope we all learn something along the way. The photos keep me from being too sad from missing the old layout, but there are many modellers who for reasons unknown just want to have a crack at another layout. My good friend Jim is onto his third layout I think. They are/were fine layouts.
Well there are quite a few photos to wade through on the Flickr site. The link is located just above the "My Blog List" on the right hand side. Forgive me if there are some double ups.
I would like to think my journey into On30 narrow gauge will be as rewarding as the HO journey.
Time will tell. Enjoy!!

Tuesday, 11 July 2017

Getting Closer....

More work has been done on the trestle this week. All the piers have been made and were dry fitted out to see how they would fit under the roadbed. When they are finally put into place then the track can be laid across the trestle and finally proceed onto Broadwater..
There is more scenery work to be done on this module. I think I will be able to reach around the piers and finish off the finer details.
Here are a few further detailed shots of the progress. The piers are just resting in position at this time.