Monday, 26 November 2018

More on Pambula


Work has continued on at Pambula after the fascia has been put in place. It is not a large location so I thought I would finish off the layout between the fascia and the outer tracks.
I made the scenery higher in this section and cut the fascia to suit. It was then I needed to fill in the missing bit. Over the years I have tried a few methods, the old layout used the well used chicken wire and plaster where I was able to reduce our pile of newspapers into the plaster mix. This makes it interesting when demolishing the old layout and I always tried to locate some old newspaper with a date left intact so I could get an idea as to when this section was done.
I have moved on from the old plaster days (although it still has its place) and tried either the yellow foam board or foam. The corner section at Pambula called for a large piece of foam and having scabbed up two large foam pieces from a clean up pile I then looked for my electric knife to slice it all up. The electric knife was on its last legs for the last piece of foam I cut when the switch broke and was running as soon as it was plugged in. The knife had definitely cut its last Christmas ham long ago. When I plugged it in there was this burning smell and at the risk of loosing the shed to a fire, it was decided to chuck it in the bin, except for the blades. So this piece of foam was cut out using an electric hand powered blade. I must admit it took a little longer than using the power but I eventually got the job done.
Replacement electric knifes seem to be rare in the shops these days but as luck had it, two days after the knife went kaput there was a local garage sale supporting the local Mens' Shed. I was just about to leave and I spotted a Sunbeam electric knife. Beauty and after opening the box  and seeing no residue of ham on the blade I asked the guys 'How much?' He said $5 but as I only had a $10 note I made a donation for their cause. I was more than happy with my purchase. I tested it at home, it worked but it is yet to be introduced to its first piece of foam.
The foam was glued into place and then came the decorating. The photo shows some yellow cloth which is a cut up piece of 'Shine Wonder cloth' that I purchased at Woolworths. I have used it often on this and the past HO layout and it works well to represent grass, at least I think so and is way cheaper than using commercial products. They used to make it in a green colour but I can only find it in yellow now, but it colours up nicely with Tamiya Flat green.
Scenery slowly greens up

The last time I used the foam for the scenery was when I did the scenery around the trestle area. I had almost forgotten how toxic the fumes were when I applied the soldering iron to the foam. It had to be done outside otherwise I reckon I wouldn't be typing this now. It was then painted up with my usual 'Harold' paint colour and some black oxide also used for highlights, plus some drybrushed lighter Tamiya paints. Most of this cutting won't be visible from the normal viewing angle so I only gave this location my 80% effort.
Mallee shelter location
One thing in my favour in regards to station buildings on the narrow gauge is that they were hardly elaborate structures. Many locations only had a nameboard which let you know where to stand for the train to stop and pick you up. More upmarket places had at least a corrugated iron shed with a seat at the back. At least it would keep the sun and rain off you while you were waiting for the train. Pambula is to get a mallee shed when I get around to building it. The layout will need a couple so I will make them all in the one go. I made a full size paper mockup which you can see in the photo. It helps visualise how it will look in the end. They didn't even have a platform so I have used some cork, coloured it to represent tarmac. Its the least I could do for them.
Two recent constructed vehicles by Stephen Postma have pulled up at Pambula
So that's all that has been happening around Pambula recently. I conclude with a few other shots taken while there.


Wednesday, 7 November 2018

A bit on the side

Wow a month has gone by since the last post. Having a large layout has good and bad sides to it. Being a member of various forums I often see finished layouts. The builder is able to make this claim because the layout measures around 2 foot by two foot in size. You wouldn't need to have a shed to put it into. Even set up in a garden tool shed it would get lonely and have enough room to invite three mates over all at the same time. I keep working away on various projects and there are multiple jobs to be completed.
There is no point making a pecking order list of jobs, I would invariably ignore it  just do the next thing I saw when I entered the shed.
As I expect this to be my last layout, I want it to look good and operate well. I hope all the years of practice can be consolidated into this layout. Some modellers are very good at whatever they lay their hands on, but for me it takes a little longer. Have a look at some of the following photographs at my woodwork to see I am not a master carpenter. The layout is strong and guaranteed to hold me up if I ever had to walk on it but why?
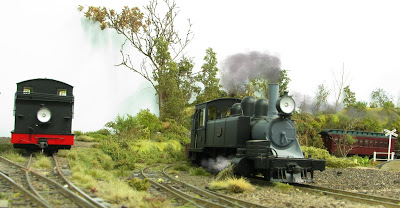
Climax 8 with a coal train and an NA on a mixed cross at Pambula
One of the quickest ways of making a layout 'look nice' is to cover up the sides of the layout mainly to be able to hide the junk underneath. This can be achieved by using drop curtains or solid sides. I intend to use both but have been recently cut up some 3mm mdf to make a start on making the layout look pretty. I ordered 5 sheets of 2400mm x 1200mm sheets of mdf and these were brought down to the shed. A shunting manoeuvre was needed to get them around a corner of the layout to their resting place for the time being. Then the next fun bit came when I had to try cutting them up vertically to save another trip outside. After getting some of the sides and baseboard edge bits done I moved them out onto the lawn to give them an undercoat. I didn't use a proper primer paint as I always seem to have leftover 4 litre tins of paint and it was good to be able to nearly finish off a leftover tin. It was a hot humid day and no sooner had I got one sheet done, it was dry and the second one completed. I don't know what drives insects to think they can land on wet paint and then take off again. Sadly it doesn't always work and quite a few insects on the day gave their life up for South Coast Rail. A very light sprinkle of rain on the day saw me rush to put a few up on their sides.
Top and bottom panels in place. Bottom panel to be fixed.
The leftover colour  that the panels were painted in was a pleasing colour called 'Abstract'. Nice as it was it was not a deep enough colour to avoid the inevitable scratches  it will receive over the years to come. It will be painted a more suitable darker grey which is shown in the left hand photo.
I have also fitted another piece that goes directly onto the baseboard edge. I decided to do this section so that I can complete the baseboard of Pambula between the edge of the baseboard and the back scene board.
I must admit it lifts the look of the layout immediately even without its final coat.
Underneath the side panel I have fitted extra boards to support the sheets of mdf. A few spots of contact adhesive will see them fixed into place.
My next project before the sheets are fixed on will be to get some carpet tiles for the floor. Once they are laid under the bottom of the sheets then they will be fixed into place. 
I was asked once why I didn't make the panels removable and couldn't come up with a reason other than once they are there they are there for good. The next time they will need to be removed is when the layout will be demolished. 
The 'corner' at Pambula

The above photo shows off my attempt of carpentry but it has resulted in a solid support despite the final finish. But the good news it will all disappear shortly under scenery.
Pambula - looking better
 One of the downsides of finishing sections of layout is the vanishing work bench space. The above photo shows how quickly unfinished sections of the baseboard become parking areas for junk. So they gradually disappear to other areas when a section becomes finished.
Pambulas corner heading towards Bega


The far end of Pambula
The above photo shows the Bega end of Pambula, the dead end siding is also visible. It also shows the area where the new baseboard work was joined into the original part of the SCR. As rough as it looks now it will all be better when it is finished off complete with scenery.
It looks like the summer 'humidity' switch has been turned on and last week I had my window 'skinny $20' air conditioner switched on. It doesn't do a brilliant job in the whole shed but enough to ensure I will find a project to do down 'that' end of the shed.
Another shot of the crossing of the two trains.
 Another project I have been doing in the shed is to try and get items relative to the Victorian narrow gauge. On the wall of the above shot is a genuine x Puffing Billy timetable that I purchased back on our first visit to Gembrook back in 2016. It was quickly grabbed from the shop at Gembrook station for only two dollars, my prize find. I had to roll it up and even had to carry it on to the plane back to Sydney. I only wish I could obtain more of these genuine Puffing Billy type memorabilia for the shed.
See you next blog.