Sunday, 1 April 2012

 Finally some good news for modellers…
Track forms a major part of a model railway, without it we don’t run. When I started with model railways many moons ago I began with Hornby clockwork trains. It was O gauge and comprised of sectional track. Each section of track had a grand total of three sleepers per length. The mob at Hornby must have worked out that it was sufficient to have one sleeper at each end and one in the middle. It didn’t matter if it was straight or curved three per length was your lot.
I think my interest in the clockwork vanished when the key was lost and the new kid on the block Tri-ang trains originated. Now they started off with a track which had a grey moulded base but I went straight to I think it was Series 3 track. Triang were a bit more generous with their sleepers and you got a lot more than three per section. Its funny looking back now but that issue never worried me, I was more interested in what ran on the tracks than what was under the train.
Eventually the Tri-ang system was abandoned and I progressed over to Peco track. Like the proverbial Model T ford, Peco track came in one size – code 100. Again this was the best track going at the time and became the benchmark for model railways. And you certainly got a lot more sleepers per length.
It didn’t seem to matter if the code 100 rail when converted to real life would have supported an iron ore railway. We were running Lima 44’s on the track and although they were the ants pants at the time later more to scale models would have us questioning what was under the train wasn’t as good as it could be. If you followed the logic of Hornby to save on materials and only give you three sleepers, then Peco could have reduced the rail profile and saved on metal.
We also had the issue of the pizza cutter wheel flanges which probably explains the high rail profile.
I think I will credit the American NMRA who introduced new finer standards in all aspects of model railways. The introduction of RP25 code wheels made the flanges so much smaller that we started to question why finer track couldn’t be introduced.
Shinohara introduced code 70 track and was readily picked up by modellers wanting finer track. Today we have Railcraft ,Micro Engineering Company and others introducing finer rail. The code 55 track certainly looks better on a branch than does code 100.
Peco to their credit eventually in HO introduced code 75 track and a complete range of points to match. Although priced similar anyone starting out should see the benefits of the finer rail and start with code 75. Peco also recognised the big American market and introduced code 83 track and points specifically for them. This track was built to the American standards and has readily been taken up and used there.
They have also made track in many other scales from Z scale up to 1 gauge.
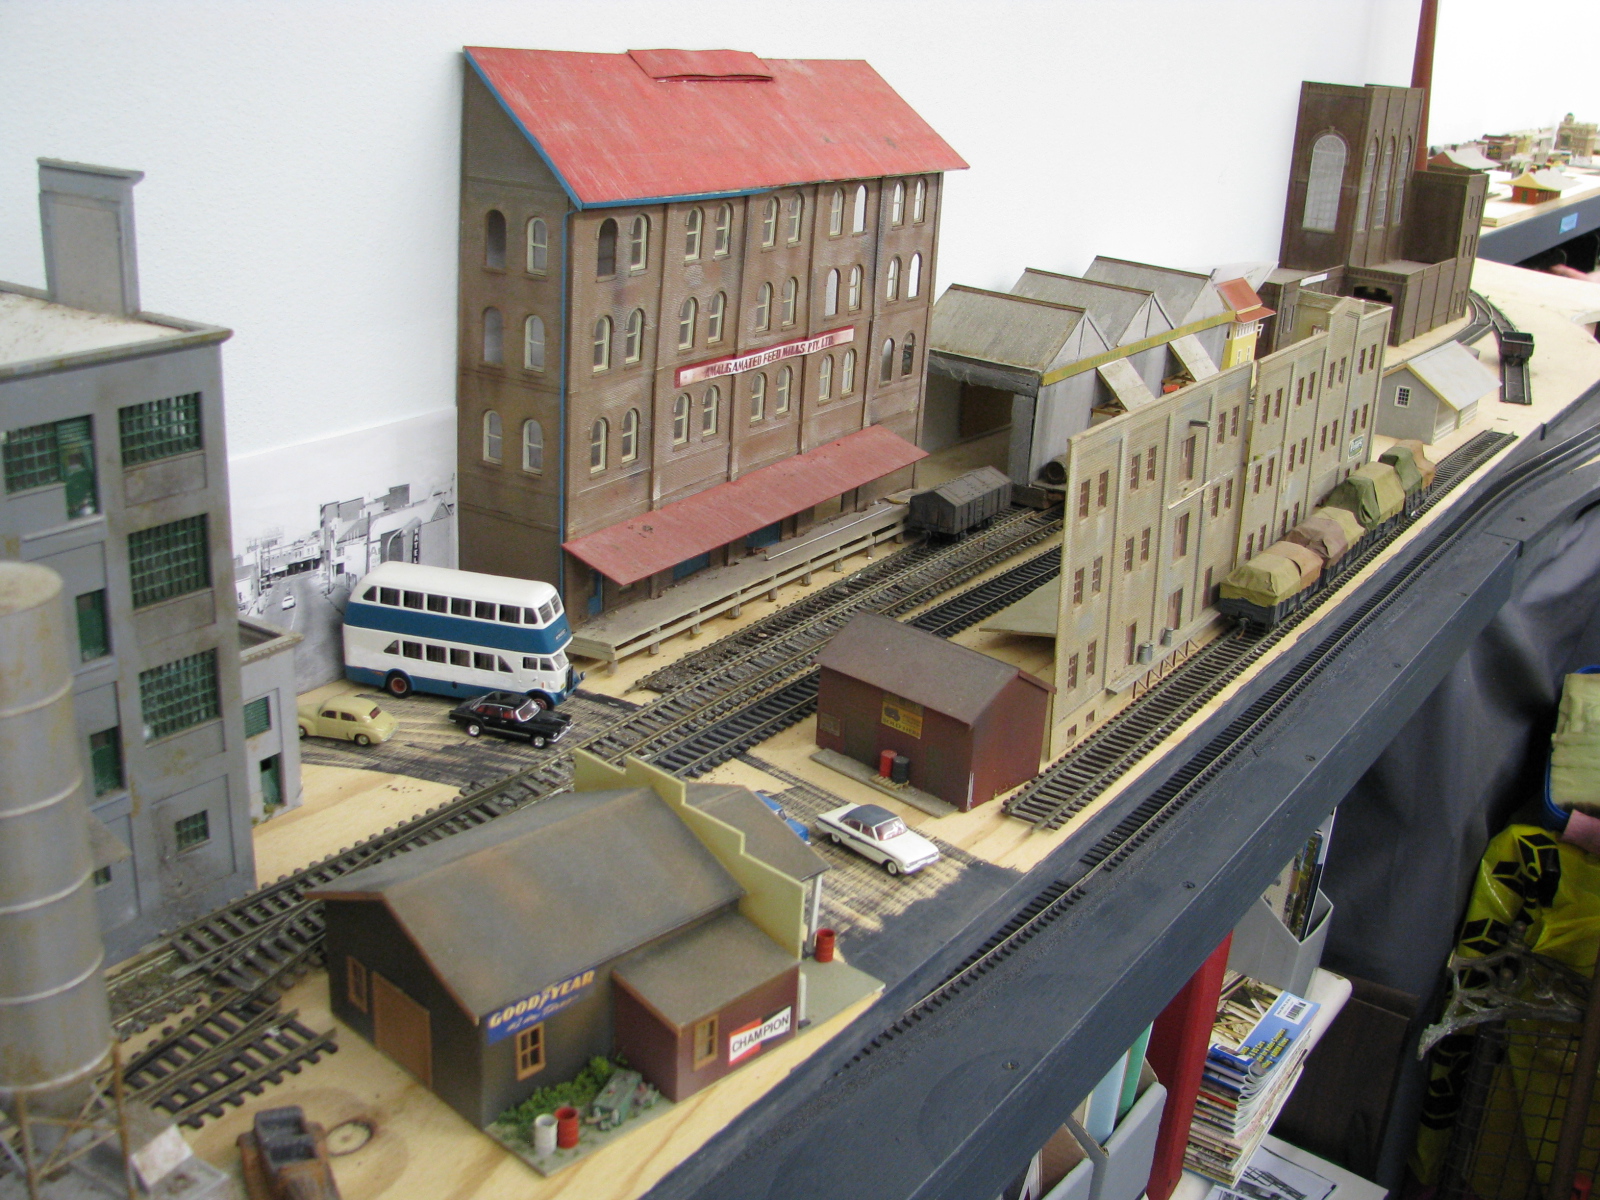
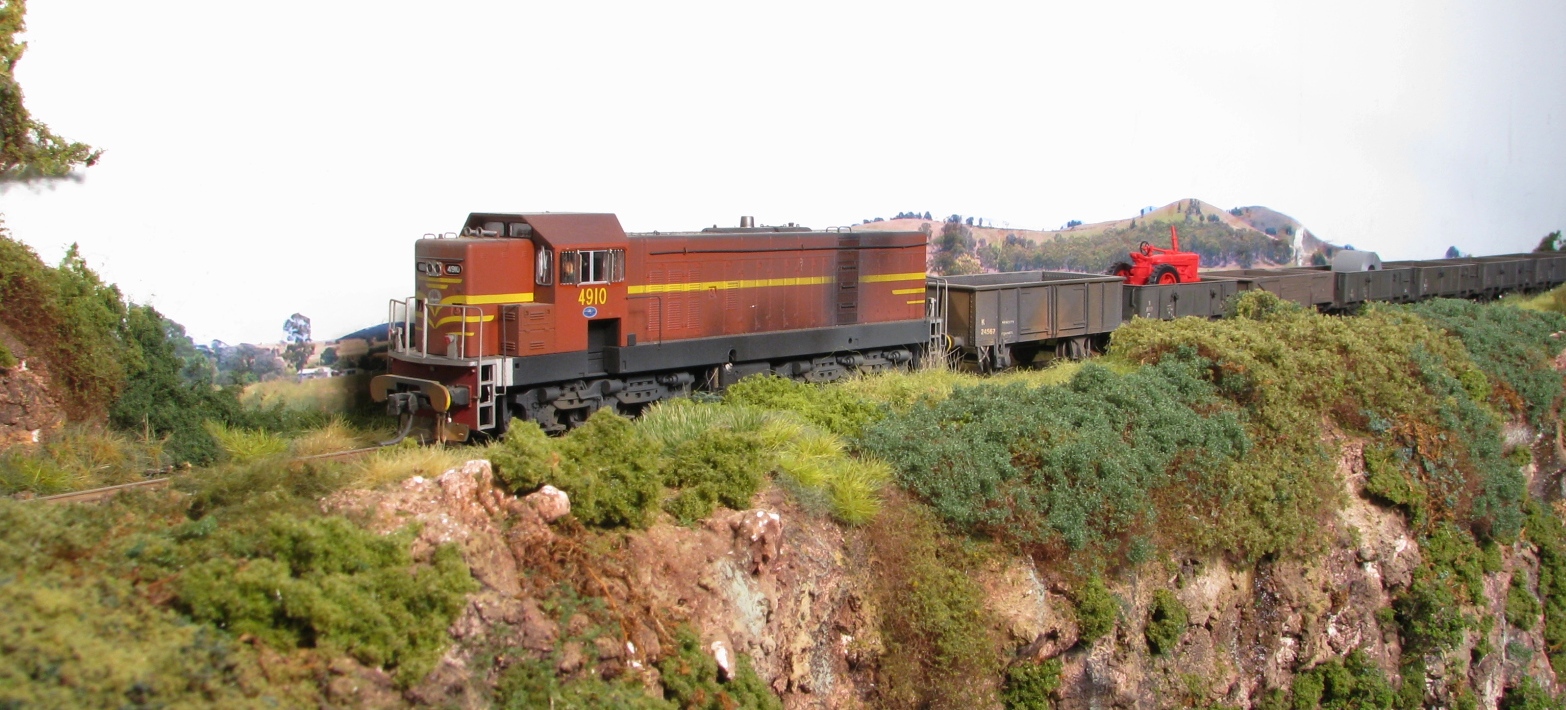
As mentioned earlier the code 100 track is suitable for iron ore railways, code 75 is getting closer for main line trackage, but there is a hole in their products as they don’t produce suitable ‘branch’ line streamline track.
But fear not, Peco I believe will soon embark on an exciting new product that being OO/HO code 55  flexible track.
To give you the background on this product and my involvement, last year while looking at their web site I saw a mention re the Code 55 track. Basically it was a survey to see if there was a market for it. I immediately filled it in and thought no more about it until I later received a package from Peco. Strange as I hadn’t ordered anything but inside the package was a pre sample of their new code 55 flex track. I was lucky enough to have been picked amongst others around the world I believe to test it out.
Now if you have only ever used code 100 and had nothing to compare it with its OK. Compare it with code 75 and it’s a giant. Now putting this sample of code 55 next to the code 75 and it also seems big. I’m not sure if the branch lines in Britain were laid with a much finer rail, like here in Australia. I have had this sample for around two months and have till the end of March to respond back with comments. I suppose Peco will then measure the world wide response to see if this commercial venture is worth while.
There is no problem with flanges on my existing rolling stock so even though I would have like spikes holding down the rail this is s great step forward for Peco. Another great move by them is also to have the rail already weathered saving you the time. When did you last see a rail side in gleaming silver??
The survey said that anyone can respond by email and let them know if they are interested in the new track. The email address is info@pecobeer.co.uk
I’m sure as soon as all the info re interest in the product is gathered then it should be advertised on their web site. I sure hope I haven’t let the cat out of the bag by revealing this exciting new product.
Get behind it and we will finally have branch line track available. Let them know we want it! Great news.


Saturday, 24 March 2012

Good night...
I have written before about a group of friends who have irregular meetings in each other homes for railway purposes only.
They are held roughly every four months when emails fly around for suggested dates. These dates have to dodge shift work, social calendars and other excuses. So if we have three a year we are going good.
Luckily they are all hang out on the north side of Sydney and at least two of the boys follow the same football team although I can let on our team lost tonight.
It was Ross's turn and I looked forward to seeing his nearly completed layout.
As can be seen from the photograph the layout is around 12 x 10 foot and sits in the centre of the room with sufficient room to move around the outside. A centre access hole provides reach for the bits in the middle.
We have watched the layout grow over the years and there is little left to complete. Ross is a perfectionist in all aspects of his work. Even the wiring in the control panel is beautiful and neat compared with my panel on SCR.
On thing in my mind he has really nailed is the ballast work. He claims a lot of it comes from the garden in the form of soil but it looks great as the photos testify. He has also done a great job on weathering some of the buildings and he quickly pointed out the pub he had just won from ebay (cream building in above photo) was about to cop the treatment.
The layout consist of two double track folded figure of eights, with a single exterior 'branch track' making three trains running at once. None of in the group have gone down the DCC road yet and I don't think this layout would gain from the conversion.
After an hour or so gabfesting and photo taking we moved inside for supper which is always interesting and settled down for a dvd to finish off the night.
Part of the discussion around the table is who turn is it next and a rough date. We settled on July which accomodates two of the members making overseas trips.
Again I have nothing to report on SCR but I will attach a few other shots I took of Ross's layout.


Tuesday, 6 March 2012

I see red......
Its just 6 days into Autumn and so far the plant is doing what it supposed to. Flower heads are forming and soon it should be full of red flowers.

Despite the crazy weather we have been having, the plant seems ok. It has been a case of too much water rather than the opposite of too little I apply to the rest of the garden.

I just hope at the end of this "gardening segment" that the plant converts to a tree OK.
Can't believe we are into March already, where does time go?
The modelling front has been a bit quite lately. I found an old signal box kit that I think was made by Rails North?. It is a two level, probably fibro (asbestos?) box completely devoid of all character. It was probably chosen because it was an easy kit to make. The material it was made from is that grey resin, the stuff thats can be straightened under hot water. The joints at the corners were certainly not finished as flush as I would have liked but I reckon I can put a downpipe from the roof in each corner and hide the rough job.
There are also very fine strips that have a thin layer of excess resin that has to be scraped off. So far I have had a 50% rate of getting the resin off the glass without breaking the ribs but I will need to either replace them with styrene ribs or maybe paint on white fine lines. Just thought of maybe you can get fine lining tape?

Sunday, 29 January 2012

Jump for Joy.....
I recently needed to go to the local hardware store and outside amongst the stuff they put there to try and trip you over was this unusual plant that caught my eye. Luckily it wasn't a rose bush or it could have done damage. There were two things that I noticed about it, the first was the price of $13 and the second was that it was the 'Autumn Joy' plant sedum.
Now this is a plant I have read about that can be turned into reasonable looking trees. I have seen the excellent tutorial done by Dan Pickard on how to turn these plants into respectable looking gum trees.
Many times I had considered in getting a packet of these seeds and starting from scratch so to speak. But it hasn't happened yet.
I returned from the store and carried it into the house. I put it down in front of my wife and said to her "look at this beautiful plant I just got for $13" It was then at this stage that I had to explain that it would one day be covered in red flowers and then explained there would be another life for the expired flowers. She had caught on by this stage and realised there must have been a "model railway agenda" in it somewhere. I told her to enjoy the beauty of the flowers and I would look after the afterlife of the plant.
When we go for a walk I'm often accused of always looking down on the ground instead of ahead and the excuse I use of "In case I tread in dog poo" doesn't cut the mustard any longer. I have found many items for the layout at ground level.
Anyhow the plant is on its way and if its true to its name and flowers in "Autumn" I shall post some pictures on some later blogs, hoping eventually to get a few trees out of the plant.
I have just done what many other Aussies may have done and had a four day bludge courtesy of Australia Day falling on a Thursday and taking a roster day on the Friday. If nothing else it eased me back into work mode after having four weeks off. I don't know how I am going to handle this five day week!!.
Managed to do a little more scenery work around what I term the gully area. This involved in making a large tree and on Thursday I ran out of foilage for it. A trip to a local hobby shop on Friday morning fixed this problem. I thought before I left I should ring in case they decided to go for a four day break as well. When the phone answered I decreed he must be open.
I must admit scenery is slow work, it seems to take hours to get anywhere but the end result is worth it all. The corner I was concentrating on was greened up on my first work in this area. The shrubbery looked a bit ratty by now, some trees had fallen over and it needed updating.

 The photo above shows the large tree that I made using the Woodland Scenics foilage. Directly above the 421 is the area I had been working on. There is still a small section requiring attention just to the right.
A wide shot of the 421 on the top bridge over the gully. The picture on the left was from an old calendar and works in very well at this spot. It is still held in place with a thumb tack but I try and omit it from shots. I'm not sure how I will blend it in yet as the photo has clouds on it but it doesn't blend directly with the wall. Will think of something to do with it one day.

Tuesday, 17 January 2012

Back on the rails......
Well after the last post which could have seen SCR ripped apart, I have come back to my senses and after a session down the shed I decided to get back into finishing off some scenery along the back wall. These photos are taken where the header photo with the garrat was taken.
It was only a small section but after a few hours later it was nearly complete. In the above photo it was the small section on the right hand side near the to be enclosed bridge pylon support. A new code 75 point had been laid but not yet ballasted, this was also completed.
The things you notice in photos, I notice that the rear left hand porthole has gone missing, hopefully it is still inside the body.
I have included some more photos for my benefit to make me feel better about not abandoning SCR.


There was a box cab on E bay but they wanted $100 and $40 postage. Thanks but no thanks.

Monday, 9 January 2012

Forgive me I am off the Rails...

This post has got very little to do with South Coast Rail but more with the brain spasm I got from the layout room the other day when visitng the shed.
I went into the shed not knowing what project to tackle next (as I always seem to do when I go there). I hardly ever run the layout mainly just build it. Its only when someone wants to come for a run that a loco is sent around to clear the cobwebs from the tunnels and dust off the track. This particular day nothing seemed to be working out OK and this set off the thought juices to maybe something else.
This something else was really 'bad thoughts' something like abandoning all I have done on South Coast Rail, selling the lot off and restarting off with a 6' x 4' board with the ability to actually complete a layout. (Something I've yet to do from over fifty years of modelling). Maybe if I put all the energy into a small area it would be done and finished quicker.
As some of the older members would relate to I started off with Hornby clockwork, moving on to Tri-ang trains. With a slight gap after I had left school I moved on to the Shinohara track with different locos that took my fancy at the time.

Then for a period in time I got into trams and traction modelling for a period. I joined the Sydney Tram Museum, went to Bendigo and Ballarat taking pictures of their systems. This also included trips to Brisbane taking some movie of their last year of trams in 1969?. Traction modelling was started by obtaining a seconds door (the back had a hole in it) and I commenced to get into tramway modelling in a big way. After a few years with this, I felt I had conquered all there was to do modelling a tramway. I had hand laid all the track and installed working overhead as well. You soon get tired of watching the tram do 384 laps in a session and I started looking around for an alternative distraction.
Next on the list (any guesses?) was 009 Narrow gauge modelling utilising EggerBahn and Lilliput models. I think this had the shortest span of attention and in the early 70's N scale was starting to become popular.
So the narrow gauge was sold off and N scale started to replace it. This choice was made easier owing to the fact that I had acceess to a small shed which suited N scale well. The shed had all the extremities filled with track and you had to duck under to get into the middle for operation. This shed must have frustrated my then girlfriend (now wife) who when she found me missing from the house knew where I was.
The N scale managed to stay intact even till we got married and moved to a new house. She still reckons we chose the second house we saw because I happened to mention that if we dug out under the house I could make a layout room. I will concede this is partly true.
Into the early eighties and they started to make better HO NSW models so again I bit the bullet and changed scales.
To get rid of a lot of the N scale equipment I remember one year when I went to the Liverpool Model exhibition. I happended to mention to some of the guys on an N trak layout brought down from Brisbane that I had some equipment to sell. They said can we come up after the exhibition that night.
Later that night a kombi van full of guys piled out into the layout room. Wow that was a successful night. Eventually it all went.
Just after this we were comtemplating moving to a house with no stairs and this was the golden opportunity to start again.
The new house had a back 20' x 12' garage and this is where SCR started back in 1989.
So if you are still with me after that model rail history lesson back to the bit where I went off the rails.
I had a link sent to me http://www.markusworldwide.ch/Railways/Chile/Tocopilla/SQM_Tocopilla.htm of this electric railway down in Chile. I had never seen it before and thought it was unique and still operating.
Photo from web site used without permission but quite happy to publicise.


At the moment this would make a great line to model. The Woodland Scenic factory fire would have no effect on its construction as you will notice if you look at the photos not a friggin tree or touch of green to be seen. As can be seen a had an earlier fondness for overhead traction and considered the making of catenary overhead to be another challenge.
The next step was to find a suitable loco that looked like these locos. The only ones that I could think of were made a long time ago by Model Die Casting / Roundhouse as Box cab locos.


The only trouble is that they are scarcer than the stuff that comes out of rocking horses to find. I also researched on the internet and found that they were poor runners. I was going to try an modify them and add pantographs as well. Has anyone out there got any they no longer need?
I also thought I could make a layout based on the Chile electric locos and also add a few shays and climaxs to the mix. Again more research on the Bachmann shays found that they were prone to plastic gear cracking, rendering the units useless. Apparently the company was aware of this issue and offered replacement gears. This problem with the plastic gears is also an issue with many of the brass models. Locos with split gears just now sit around unable to move. Hundreds of dollars tied up from a lousy plastic few cent cost plastic gear. You would have thought Bachmann would have been aware of this problem before chosing plastic gearing.
So unable to get any Box cab locos and being wary of the shays I didn't have full confidence of making the switch and flogging off SCR.
To make myself feel better I decided to draw up a plan of what I might have built. It was to be a mixture of motive power both electric and non electric. On the plan the red is diesel and steam track and the blue represents electric operation. There are ore, coal and log traffic just to keep it busy. The plan below covers 10' x 12' (One foot squares)

I will now admit to having my plans complex like the proverbial spaghetti bowl as the following plan will attest. Once a layout is built I like to focus on operation, not just watch a train go back and forwards on a straight bit of track or a circle with two sets of points. Achieve layout construction, scenery making and then operation.
The layout was designed for two stages, the left hand terminus and the bottom board, then the top right hand board. Unlike the Chile photos this layout would be rivers, hills and plenty of greenery.
The track shown in red are the unwired ones meaning steam lococ would travel over the whole layout for shunting. I like the idea of interchange between the steam/diesel and electric. This provides more interesting operation. A few crossing loops as well helps the operation side of things. The layout would be built to standard gauge as some of the material was to be salvaged from SCR. I was looking on the internet for layouts of this style but the closest you get is by going to the narrow gauge style layouts. The curves are mainly 18" radius with a few 15" radius to fit it all in.
To to make operation not so straight forward I devised the following trackage between the two major boards.
A train come in from town A, six cars and a loco long. It then goes into Town B. Loco runs around and take three cars into the switchback, it then propels them to track 2. Loco returns back to Town B for the remaining three cars which it then propels into 3. It then reverses onto track 4, then back to track 2 to pick up the first three cars. All 6 cars and the loco head off towards Town C.
A similar process is done but track 1 and 4 are used when going from Town C to Town B. These switching problems are what makes layout operation more interesting to me.
Well no cause for panic as I went down the shed again today and ran a few trains and got the "short line" out of my system.
I shall put this track plan on the back burner, maybe one day I will get to build it. Sorry for the long winded blog today. SCR rules.

Thursday, 29 December 2011

Santa delivers
Santas been
Well this is what the man in the red suit left. It wasn't exactly left under the tree but carefully positioned on the layout just prior to the big day.
The model is an Ian Lindsay kit that was assembled and painted by renown modeller Howard Smith. It was one of two locos assembled for David Anderson from Mansfield Hobbies. The other 70 class was weathered but I ended up with the clean one. I will have to see about getting it 'dirtied' up a little.
I would rather get this loco than a 73 class for a shunter as they were an earlier model. They spent most of their life around the Port Kembla area in real life shunting usually with two coupled together.
As South Coast Rail is situated a little further south on the same Illawarra line I was able to convince the local DLE to release one for shunting down Bega way.

7002 shunts the meat siding at Narooma
 The model is very light and would benefit with some weight stuffing. It made its way up to Candelo with plans to make it the coal mine shunter. This was soon cancelled when load trials found out that it could only take two empty BCH's there at a time. There is a short sharp grade as the line leaves Candelo and this is where it failed. A 44 class will take up 9 BCH's and a van in one go. Hopefully if the 48's ever get here, it might become a shunter for Candelo and the mine branch.
One minor problem with the 70 class is that it has a low slung open gearbox. Twice it has stalled due to it running over some small pieces of foam it ran over between the tracks and were sucked into the gearbox and it stopped. I will either have to try and cover it up or make sure there are no stray bits of foam in the four foot.
As most of the yards on SCR are level, shunting trains of reasonable length shouldn't be a problem.
7002 shunts the yard at Bega

This will be my last posting for 2011 and I look forward to 2012 as hopefully the models I have been waiting for such a long time might appear. My second sound loco, a 40 class and eventually some 48 class and the 422. Throw in some bogie tank cars, BSV's and it should be a good year.
I am on a short break at the moment and hope to be able to visit the 'shed' more often.
Roll on 2012

Sunday, 27 November 2011

Rolling in dough
This Saturday I attended a sale day presented by the Epping Model Railway club. They were most considerate by having it start at 10.0am, as both Saturday and Sunday are currently my favourite sleep in days.
It was a lousy week for weather and I spent the fifteen minutes up to opening time sitting in the car waiting for the rain to stop.
At 10.0am right on the dot they threw open the doors and welcomed us to market day. There are two large rooms with private buyers having tables with their goods to sell. Most seemed to be private set ups, but Austrains were also there. I guess their motive was to save you postage. They didn't get a visit from me.
Past visits to these sales have been good for me. In the past I purchased a completed Hanovale weathered bogie ballast plough (BBP) for $25. I also acquired an Ian Lindsay bogie van (MCV?), last year I purchased some oil tanks.
This year I was lucky to pick up two Ian Lindsay Models that had been assembled but at this stage unpainted and decalled.
One of the kits was an EHO brakevan (commonly referred to as 'a loaf of bread' - hence the title of this thread) This is listed on the ILM website as $93 as a kit.


Also with the EHO was an assembled kit for another Ian Lindsay model being the KB mail van. (Listed for $77)

When I asked how much they were I quickly snapped them up at a bargain $30 each. Now I'm not sure how long they will stay unpainted like this, maybe when I get sick of doing scenery and have a break and finish off a few kits etc.
A quick trip round the rest of the tables didn't reveal much more. True there was plenty I could have got but having these two models in the bag so early made me more choosy regarding the rest.
The day is also enhanced by the club providing a sausage sizzle on all day. It was also interesting to see some well known modellers present with bags of 'leftovers' being flogged off. You know a few decals, plus a few other bits and pieces in a plastic bag for $20 or so. Kits they no longer wanted or could be bothered to put together.
After an hour or so I decided to leave, the rain had stopped by then and with my bag of goodies I headed home.

Sunday, 20 November 2011

Fotopic has got the Flick (r)
I must have been one of thousands around the world that had photos lost when Fotopic suddenly shut up shop. I was posting photos there long before I had started this blog.
The story of how I also lost many photos when the hard drive crashed and was rescued by 'Albert' who had downloaded some of my photos was recorded on this blog recently.
In looking for another web hoster for some South Coast Rail I reckoned that Flickr was as good as any other, so I have recently uploaded some of my favourite shots onto this site. All seems well so far. A lot of the shots have already been on either fotopic or on this blog over time, but it groups them all together without the need to read all of my crap writings in between.
This weekend in the shed was a poor effort, only managing a few more shrubs outside the tunnel that supports Kameruka. So no need to show any of that effort.
The year has gone extremely fast again (Anyone else notice?) and I am looking forward to another break off in the new year.
The manufacturers should be a lot kinder to us NSW modellers with three locos I am waiting for will hopefully get delivered (48 + 40 + 422) and a few freight wagons as well.
Anyhow to get to the Flickr site just hit the link under "links in the right hand column "More South Coast Rail photos" and I hope you enjoy them the second time around.

Saturday, 12 November 2011

Bonding Session
Well last night was another train night get together between our group. Most of the group  are known together because of the school link.

This link must be nearly rusted through as we go back to the mid to late 1960's. As I was not as smart as the other guys I left school earlier. I can see that the extra two years of schooling paid off for them as they have all done well in their careers and we are all approaching that magic thing called retirement. I was out already earning an income on the New South Wales Government Railways. Starting at Darling Harbour Goods Yard I only had the site and smell of 19 class shunting during lunch breaks while they were enjoying the smell of the hot asphalt in the school yard.
We met up again years later and begun having our irregular  train nights. We get in about three to four a year which pales compared to some groups who seem to see each other each week. One of our group was the late Ken Bowen, always the character and ready to show off his  large under house 'O' gauge model railway

Last night was Phils turn again and we were keen to see his progress from our last visit on Friday the 13th February, 2010. If you go back to my blog on that date you will see his initial work and now the progress he has made.
Phil makes and adjustment to the draw slider. On the left hand side is where the branch to Newcastle station will eventually be.

 Although rain was predicted, it didn't compare with the deluge we had at Phils previous visit.
The layout room scores a 10 out of 10 for design and comfort. Tons of fluro's, light blue coloured walls.
The layout design is a double track folded 8 with dogbone returns at each end. There is a branch into Newcastle and off that there will be a small shelf shunting section based on the Wickham Branch. Off the lower layout section there will be another branch station he will be calling Swansea. In the photo above is what he calls Broadfields (based on Broadmeadow). In the centre of one dogbone he is incorporating his 'Broadfield' turntable and loco depot. On the other dogbone will be a coal mine.

Early days on the Wickham Branch where the tracks and structures are laid out to see how they work. The gold top bottle is not expected to be a future structure.

Looking the opposite direction the curse of Newcastle another level crossing takes shape.
As there is a large amount of rolling stock on the layout Phil has incorporated a clever draw system as seen below for storing train consists in between runs. I have seen these used before on other layouts (Brad - Armchair Modeller). In this example the drawer cleverly slides under Broadfields above making the most of the room. On the far right of the layout Phil has used the conventional points into parallel sidings.
 
The multiple storage roads on the drawer slide. At least they are away from the dust when its slid in.
The future Broadfield Loco depot and mine on the right hand side

Close up of the future mine. Note the very solid baseboard construction

There is not a lot of area on the layout that can support scenery. I thought that his previous layout had more than this one will. I don't suppose that's a bad thing as he will get his layout finished sooner.
So we ran a few consists around and Ross gave his set of 4 new Trainorama BCW's a run. I noticed he was quick enough to get them off the train consist that was sitting on the draw slide before Phil could shut them away on him.
We later adjourned upstairs to partake in some tea, coffee, cake and scones and enjoyed an old black and white dvd on Steam on Hawkmount. It was a great way to finish off the night. Thanks Phil we will look forward to more progress in another year or so.

Saturday, 5 November 2011

All in all its just another bit near the wall....

Close enough to that famous Pink Floyd song The Wall. Close enough indeed.Todays effort was to finish some scenery from the gully corner up to Kameruka. Having only a centimetre or so between the track and the wall it seemed the best finish would be to put a photo landscape scene there. As luck would have it, I had a photo scene taken from the platform at Tarago a few years ago when on a tour taking two 49's to Goulburn, then swapping a 49 for a 48 class. It was a perfect day there and I just took about three panorama shots.After some manipulating and cropping on the computer, mainly to delete the foreground tracks in the yard, I printed and glued them together. I was quite happy with the end result . This photo image has been sitting around in the shed for a few years now waiting a final resting place on the wall. It is not completely successful in that it is not very high in parts. I could have enlarged it on the computer but it will do for now. Maybe a replacement when the other two hundred and seventy five jobs are done.
The sheet had clouds present which didn't match the blue wall of the shed. So I got to work with the craft knife and cut away all the clouds and it now blends in quite well.There was only a gap of a centimetre or two to fill in between the track and the wall. I used some cleaning cloth 'grass' and a few other bits and pieces. The colouring matches fairly well and the blend line is not really obvious in the photo.