Into Loco
Not a lot of progress inside the shed lately but finally after around 25 years I have started to box in the eaves of the shed. This will finally stop all those pesky creatures that normally live on the outside from taking up residence inside the shed. Amongst those creatures are possums and rats. (See multiple older blogs for details) Its one of those "will do it later jobs" which you always seem to put off and never get around to doing. I must admit the visible side of the shed has had the eaves filled in and the left hand side of the shed painted. Its so long ago but the paint must have run out as only half the front was painted. Scrap bits of timber were nailed up to the opening to deter pests from entering the roof cavity. A few years ago I saw a swarm of bees who thought the shed would make a nice home. Thank goodness they didn't stay long and left.
I had some fibro sheeting put away years ago just quitely sitting along side of the shed waiting for the big day to be used. Now to put up long lengths over two metres long up a ladder on your own and be expected to nail upside down and hang on to avoid falling is a big ask. So far no falls but I had to devise a way of not only getting up the ladder carrying a large sheet but have it stay up there so I could nail it. I put a few scraps of timber nailed to the shed which held one edge. To hold the outside edge, I drilled holes in the bargeboard and put nails in the hole. Then after carrying the board up the ladder, slipped the shed edge over the scrap bits and slowly pushed the nails through along the bargeboard to support the sheeting. Have you ever tried nailing upside down? I had to pre-drill holes to make this task easier.
Now as this sheeting had been around for quite a few years I suppose I can't blame it for snapping in half as I was carrying it up the ladder. A few choice swear words, down the ladder again, recut the sheet again and now the sheet being half its original length was so much easier to handle. Well I nearly have the front bit done and this will allow me to eventually get another coat of paint onto it.
Inside the shed I have been doing some more ballasting around the loco roads, nice and dark with dropped oil spots as you would expect in this area. A few bits of grass around the point motors to blend and hide them was also applied.
During the week I hope to get some timber about 150mm high to sit on the window sill and form the backdrop to the station. This will make it visually better and allow a backdrop to put behind the station. It will also form a good backdrop for photography. Once this is done the platform can be put into place.
When I was uploading the above shot from the camera to the computer, there was a folder dated November 2000. Quickly doing the sums this was 14 years ago, have I really been building this layout for so long?
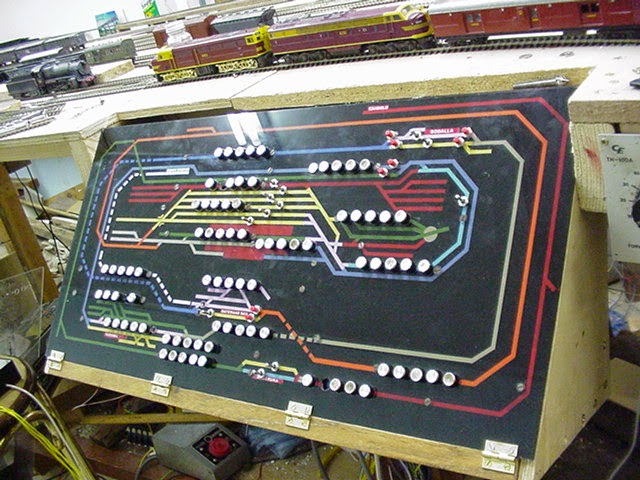
This is a shot of the control panel for South Coast Rail. Now I'm almost sure DCC wasn't around in 2000 so this will allow me to post this shot without getting into too much trouble. It was made on a sheet of perspex. The tracklayout was drawn in reverse onto the brown paper. Then the track sections were cut out with a razor blade and painted so adjoining colours were different. Once all this had been done the remainder of the back was sprayed with black gloss paint. This then secured the track painted lines under the black paint. The front layer of protective paper was then removed. The pushbuttons were a Dick Smith product I got many years ago when they used to sell usefull things not like now. Originally an 8 gang pushbutton unit, I removed three buttons to allow 5 controllers to control each section of track. I has worked well to this day. The usual pushbuttons for the point motors were also installed. The only drawback with this style is that you have to be sure you don't want to change the trackplan once its all painted up and the holes drilled for the buttons.
Tomorrow I will be heading off to the Liverpool exhibition to catch up with a few people and hopefully enjoy the day.

No comments:
Post a Comment